Browse the Library
Wiki Home > MediaMonkey 5 Help > Browse the Library
Basic Concepts
The Main MediaMonkey is split into panels and the panels can be configured to show different windows. The panels available are:
- Top Panel, which displays on top of all panels using the full width, disabled by default, this panel only supports wide windows
- Left Panel, which by default displays the Media Tree window
- Right Panel, which by default display the Playing, Preview and Lyrics windows
- Main Panel (Bottom) which displays at the bottom of the Main Panel (Filelisting) at the same width, this panel only supports wide windows
- Bottom Panel, which displays on bottom of all panels using the full width, which by default displays the Player, this panel only supports wide windows
The windows that can be put in these panels are:
- Media Tree, a wide window
- Playing
- Preview, a window showing details about the playing or selected file or the visualization
- Lyrics, a window showing Lyrics for the playing file
The Main Panel is non-configurable and displays the Filelisting. The Filelisting can be configured to show additional windows like the Column Filter, Tree (Folders), List (Folders), Grid (Folders) and Statusbar depending on what content is displayed in the Filelisting.
The Left and Right panel can be quickly hidden/shown using their respective button for this above the panels in the Toolbar.
Interface

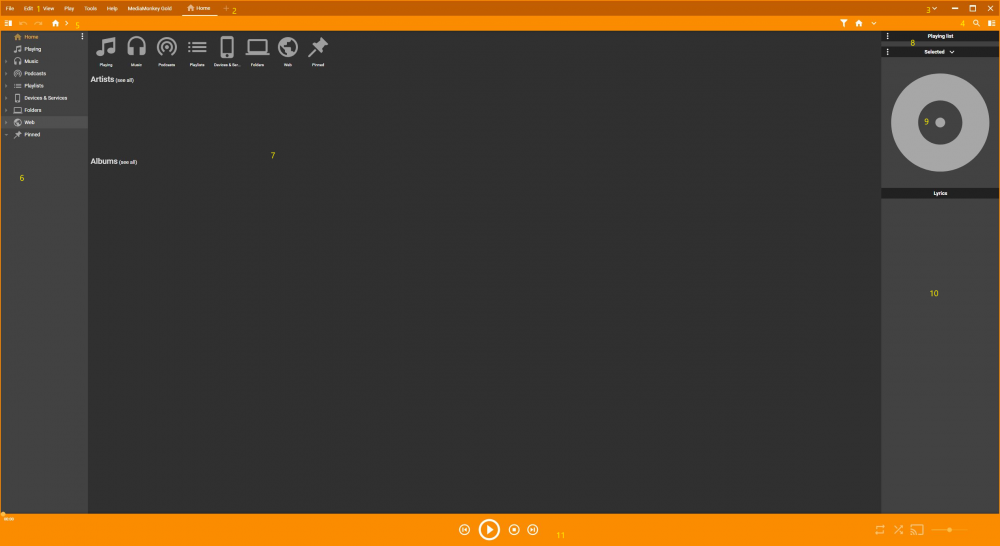
Starting from the top, here's a brief description of the various other functions in the main window:
- The Main Menu allows you to access the various options and features in MediaMonkey. It can be set to auto-hide by disabling View > Menu bar from the Main Menu. When disabled a hamburger menu will be shown in its place allowing you to access all menu items.
- The Tab toolbar allows you to navigate between the different open tabs.
- The Player Type button allows you to switch to the MiniPlayer and the MicroPlayer.
- The Search toolbar allows you to do a quick search in the Entire Library or the current Filelisting content. Which fields are searched can be changed under Tools > Options > Search from the Main Menu.
- The Toolbar shows different content based on what is shown in the Filelisting. This is non-configurable.
- The Media Tree gives access to the different sections like Playing, Collections, Playlists, Podcasts, Folders, Pinned, and Devices & Services. The Media Tree by default is only one level deep. If you prefer to navigate using the Media Tree, click the ⋮ symbol in the Media Tree, and enable Show all subnodes.
- The Filelisting shows you all the files pertaining to the selected node in the Media Tree, a Web Browser, Devices or Services settings or what's Playing, depending on which node is selected in the Media Tree.
- The Playing window displays the list of files queued to be played by the Player.
- The Preview is a window showing details about the playing or selected file or the visualization. This window can be configured under Tools > Options > Preview from the Main Menu.
- The Lyrics window shows the Lyrics for the playing file.
- The Player displays the currently playing Media File. What is shown can be configured under Tools > Options > Player from the Main Menu.
Related Information
- Collection Sub-Nodes
- Playlist Node
- Folders / Pinned / Devices & Services Nodes
- Podcasts node
- Net Radio
- Customizing MediaMonkey
Previous: Adding Existing Files to the Library
Next: Playing Files
| English |
Additional Help: Knowledge Base | Forum | MediaMonkey Support | MediaMonkey for Android Help | MediaMonkey 5 Help | MediaMonkey 4 Help